SnapShot ToyCamera 偼丄LOMO 傗 Holga 側偳偵戙昞偝傟傞丄僩僀僇儊儔晽偺幨恀傪嶣偭偨傝丄嶌偭偨傝偱偒傞傾僾儕偱偡丅
僇儊儔嶣塭偡傞帪偵丄僼傿儖僞乕傗僼儗乕儉傪愝掕偟偰帺暘岲傒偺僩僀僇儊儔晽偺幨恀傪嶣傞偙偲偼傕偪傠傫丄iPhone偺幨恀傾儖僶儉撪偺夋憸傕僩僀僇儊儔晽偺幨恀偵偡傞偙偲偑偱偒傑偡丅
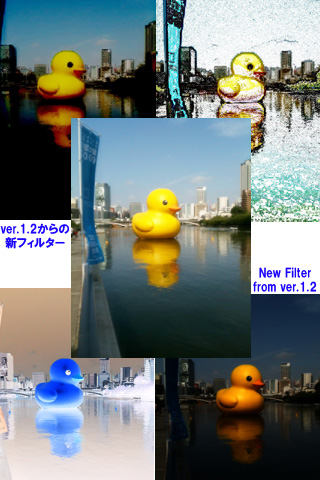
傑偨丄夋幙傪僩僀僇儊儔偵嬤偯偗傞偩偗偱偼側偔丄暋悢偺幨恀傪廳偹偰嶣塭偡傞乽懡廳業岝乿傗丄乽僷乕僼僅儗乕僔儑儞乿偑擖偭偨幨恀側偳傕嶣塭偟偨傝丄嶌傞偙偲偑偱偒傑偡丅
乽懡廳業岝乿嶣塭帪偵偼丄業岝尦偲側傞幨恀傪丄僇儊儔嶣塭帪偺僈僀僪偲偟偰昞帵偡傞偙偲傕偱偒傑偡丅
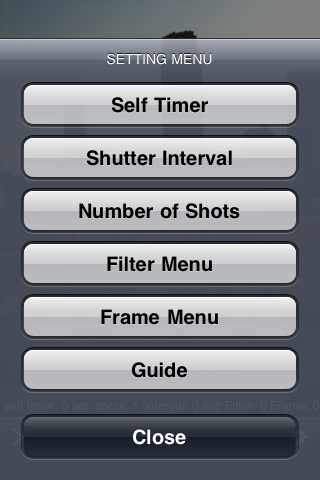
僼傿儖僞乕傗僼儗乕儉偺懠偵丄僙儖僼僞僀儅乕丄嵟戝俉枃傑偱偺楢懕嶣塭乮嶣塭娫妘丒枃悢偺愝掕偑壜擻乯丄夋憸偺曐懚僒僀僘側偳傪慖戰偡傞偙偲偑偱偒傑偡丅
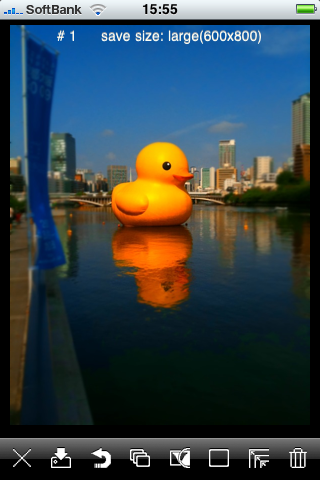
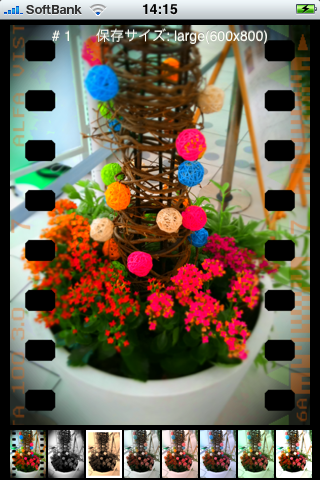
嶣塭偟偨傝丄撉傒崬傫偩幨恀偼丄僒儉僱乕儖昞帵偵傛偭偰娗棟偱偒丄嵟戝俉枃傑偱摨帪偵曇廤壜擻偱偡丅
傾僾儕撪偺昞帵偼擔杮岅偱昞帵壜擻偱偡丅
(iPhone杮懱偺尵岅愝掕偵埶懚)
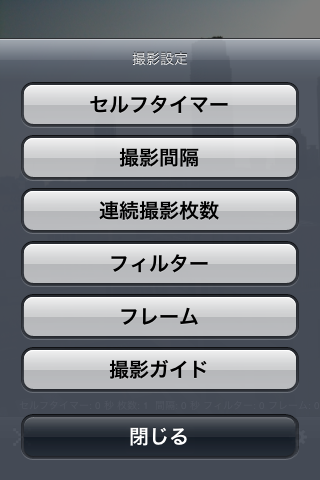
亂嶣塭帪偺婡擻堦棗亃
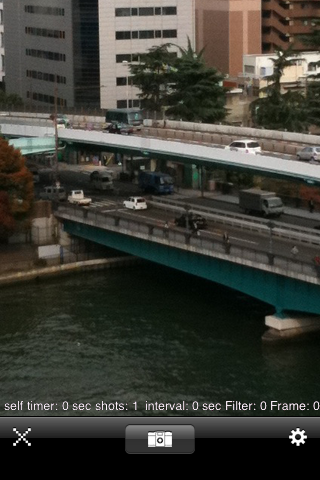
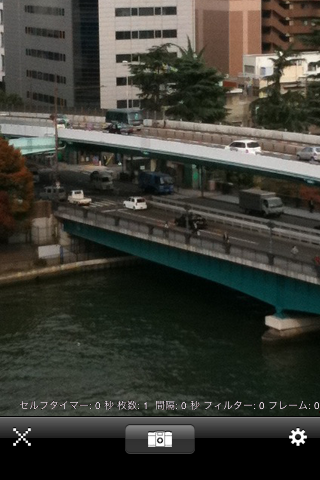
丒僙儖僼僞僀儅乕婡擻丗 懄帪丒2昩丒5昩丒10昩偐傜慖戰
丒嶣塭娫妘丗 楢懕丒栺1/2昩丒栺1昩丒栺2昩偐傜慖戰
丒嶣塭枃悢丗 1枃丒3枃丒5枃丒8枃丒惓曽宍(1:1)偐傜慖戰
丒幨恀傊偺僼傿儖僞乕僄僼僃僋僩偺捛壛乮俆庬椶偐傜慖戰乯
丒幨恀傊偺僼儗乕儉僄僼僃僋僩偺捛壛乮俁庬椶偐傜慖戰乯
丒僈僀僪昞帵婡擻乮悈暯埵抲妋擣梡/懡廳業岝帪偼崌惉偡傞幨恀傪僈僀僪偲偟偰廳偹偰昞帵乯
丒懡廳業岝婡擻乮曇廤儌乕僪偺儊僯儏乕偐傜慖戰偟偰丄懡廳業岝儌乕僪偲偟偰嶣塭傪峴偄傑偡乯
丒嶣塭帪偺愝掕忬懺偺曐帩
亂曇廤帪偺婡擻堦棗亃
丒夋憸偺曐懚丗侾枃偺傒丒慡夋憸偐傜慖戰
丒夋憸偺暋惢丗曇廤夋憸傪嶌嬈椞堟偵暋惢偟傑偡
丒傾儞僪僁丗夋憸傪侾僗僥僢僾尦偺忬懺偵栠偟傑偡
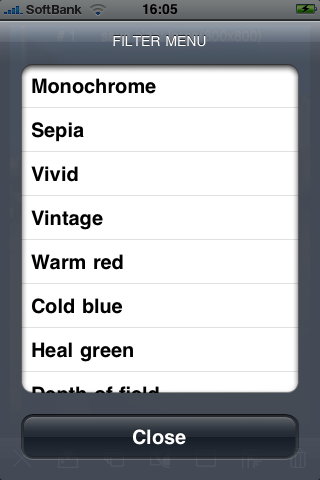
丒幨恀傊偺僼傿儖僞乕僄僼僃僋僩偺捛壛(21庬椶偐傜慖戰)
丒幨恀傊偺僼儗乕儉僄僼僃僋僩偺捛壛(7庬椶亄懡廳業岝儌乕僪亄擔晅)
丒夋憸曐懚僒僀僘丗 SMALL(300X400)丒MIDIUM(600X800)丒LARGE(900X1200)丒XLARGE(1200X1600)丒僆儕僕僫儖偐傜慖戰
丒夋憸偺徚嫀丗侾枃偺傒丒慡夋憸偐傜慖戰
亂僼傿儖僞乕僄僼僃僋僩堦棗亃
丒儌僲僋儘乕儉*
丒僙僺傾*
丒價價僢僪*
丒僋乕儖價儞僥乕僕*
丒僂僅乕儉價儞僥乕僕
丒儂儚僀僩僼傽儞僞僕乕
丒僽儔僢僋僟僗僋
丒價價僢僩僀僄儘乕
丒僂僅乕儉儗僢僪
丒僐乕儖僪僽儖乕
丒僸乕儖僌儕乕儞
丒旐幨奅怺搙*
丒僜僼僩僼僅乕僇僗
丒僴僀僐儞僩儔僗僩
丒柧傞偝乮+乯
丒柧傞偝(-)
丒僼傿儖儉棻巕
丒怓傓傜
丒僱僈僼傿儖儉
丒怓偊傫傄偮
丒桘奊
(* 偼嶣塭帪偵傕慖戰偱偒傞僼傿儖僞乕僄僼僃僋僩偱偡)
亂僼儗乕儉僄僼僃僋僩堦棗亃
丒僩僀僇儊儔(崟)*
丒僩僀僇儊儔(敀)
丒僩僀僇儊儔(柧奃)
丒僩僀僇儊儔(埫奃)
丒傆偪偁傝幨恀*
丒僷乕僼僅儗乕僔儑儞*
丒僷乕僼僅儗乕僔儑儞(BL)
丒擔晅
丒懡廳業岝
(* 偼嶣塭帪偵傕慖戰偱偒傞僼儗乕儉僄僼僃僋僩偱偡)
|
SnapShot ToyCamera is application to take and make the photograph likes teken with Toy Camera .
(Toy Camera means like Holga , LOMO...).
You can use filter effect and frame effect likes Toy Camera what you wants, not only use to take a new photo,but also use to picture in your iPhones Photo Albums.
And not only the quality closer to the toy cameras by filter ,but also this application can teke and make "Multiple Exposure" photo ,and you can take and make a photos containing "Perforation".
When takes "Multiple Exposure" shots,superimposed picture is overlaid as a guide.
In addition to filtering and frame, you can select "Self Timer","Continuous Shooting"(you can set interval,number(8 shots max)),save picture size.
Up to eight photos (you takes or imported )can be edited at the same time,and managed by thumbnails
[Shooting Features]
-SELF TIMER: Immediately,2sec,5sec,10sec
-SHUTTER INTERVAL: Continuous,About 1/2sec,About 1sec,About 2sec
-NUMBER OF SHOTS; 1SHOT,3SHOTS,5SHOTS,8SHOTS,Square(1:1)
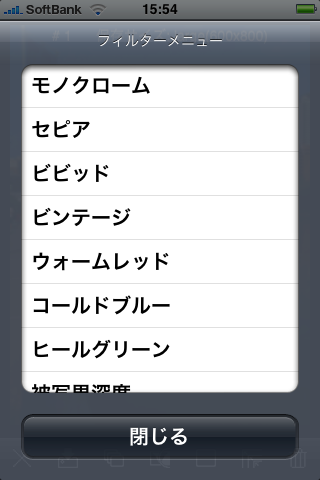
-FILTER EFFECT:Choose from 5 types
-FRAME EFFECT:Choose from 3 types
-GUIDE:Check the horizontal and vertical,When "Multiple Exposure" superimposed picture is overlaid as a guide.
-Multiple Exposure Mode(Enter from [Edit Mode])
-camera setting / size hold at latest condition
[Editing Features]
-SAVE PHOTO:Choose from 1Picture or All Pictures.
-REPLICATION PHOTO:Replication photo to empty edit area.
-UNDO Feature.
-FILTER EFFECT:Choose from 21 types.
-FRAME EFFECT:Choose from 7 types +Date+ Multiple Exposure Mode.
-PICTURE SIZE: Chose from SMALL(300x400),MIDIUM(600x800),LARGE(900x1200),XLARGE(1200x1600),ORIGINAL
-CLEAR PICTURE:Choose from 1Picture or All Pictures.
[Filter Effect]
-Monochrome*
-Sepia*
-Vivid*
-Cool Vintage*
-Warm Vintage
-White Fantasy
-Black Dusk
-Vivid Yellow
-Warm Red
-Cold Blue
-Heal Green
-Depth of field*
-Soft focus
-High Contrast
-Brightness(+)
-Brightness(-)
-Film
-Unevenness
-Film negatives
-Color pencils
-Oil Painting
(* is filter effect can use both in take picture)
[Frame Effect]
-Toy Camera(B)*
-Toy Camera(W)
-Toy Camera(LG)
-Toy Camera(DG)
-White frame*
-Perforation*
-Perforation(BL)
-Date
-Multiple exposure
(* is frame effect can use both in take picture)
|